Select the device which you develop the application for:
Things you will also learn:
- Scene (.sc) file and the Scene Start command
- How to add comments in code
- Coordinates in Game Pilot (for iPad)
- How to make your own projects
Today we will need the "1 Adding a background" project. You can open it directly on your iPad. Start Game Pilot, select "Prepare demo project", then select the "1 Adding a background" project. Open the project.
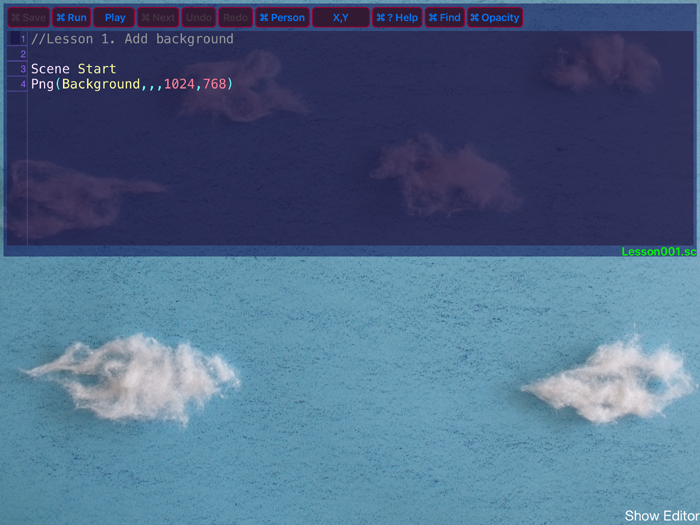
You see background on your screen. This is all the project consists of.
If you tap "Show Editor" in the bottom right corner, you will see the source code:
- - - - - CODE BEGIN - - - - -

//Lesson 1. Add background

Scene Start

Png(Background,,,1024,768)

- - - - - CODE END - - - - -
Doubleslash // is used for comments. Game Pilot ignores any text on the line after doubleslash.
This file is also called file of scene description. There are game scenes listed in this file. A game can consist of lot of scenes. For example, on the first scene, a bee is flying. As the next scene opens, one sees a frog in a puddle. In our case, there is only one scene.
The very first scene is always called Start. You should always point the name of a scene in the very beginning of the file. So the command Scene Start points the name of our first scene.
The next command is: Png(Background,,,1024,768)
For Game Pilot, it means: output the image Background.png. 1024,768 – are the image sizes relative to coordinate system of iPad.
To place images correctly, Game Pilot uses coordinate system depending on iPad orientation:
Landscape 1024х768 (image coordinates are in range [0..1023, 0..767])
Portrait 768x1024 (image coordinates are in range [0..767, 0..1023])
The Background image is made for iPad with Retina display and therefore it has sizes 2048x1536. To fit the image on the screen, we will point for this image: 1024,768.
Now, download the folder of the project "1 Adding a background" on your computer – click this link to download a copy of the folder from our site. There are two files in this folder:
Lesson001.sc - this is a scene description.
Background.png - this is a background image.
Note that the .sc-file has the same name as the folder of the project itself.
Open the Lesson001.sc file (for example, in Sublime Text 2 program). You can edit this file.
Task 1:
Find or create yourself any other background (in PNG format) which has size 2048x1536 pixels. Give it another name (for example, „Hello.png“). Change the source code on your computer so that the new background image is loaded. What did you have to change in the source code? Now, transfer the background image and the changed .sc-file into the project folder on iPad using FTP or using USB cable.
Start Game Pilot.
If you use FTP for file transferring, select one of the options:
FTP reading
FTP read/write permission
Select your project from the list.
If you copied the files using USB, select the option Locally and select your project from the list.
Task 2:
Now, try to create your own project. First, create an order on your computer (for example, with the HelloWorld name). In a text editor, create a file and give it a name HelloWorld.sc. Note that the order and the .sc-file have the same name. Place the HelloWorld.sc file into the HelloWorld order.
In HelloWorld.sc file make the Start scene (command Scene Start).
Find or create any background image for this scene.
Transfer the HelloWorld order (with the HelloWorld.sc file and with the background image) to your iPad.
Run the project and see if everything looks as it supposed to.