Select the device which you develop the application for:
Things you will also learn:
- what is "sprite"
- what is "pixel"
- what does "screen size in pixels" and "sprite coordinates on the screen" mean
- how to describe a character (.stt-file)
- how to open a character file in Game Pilot
- what is "state" of a character
- commands: Scale, Img=…, Rest.
Today we will learn to output a character on the screen.
Start Game Pilot, select "Prepare demo project", then select the "2 Output of a character" project. Open the project.
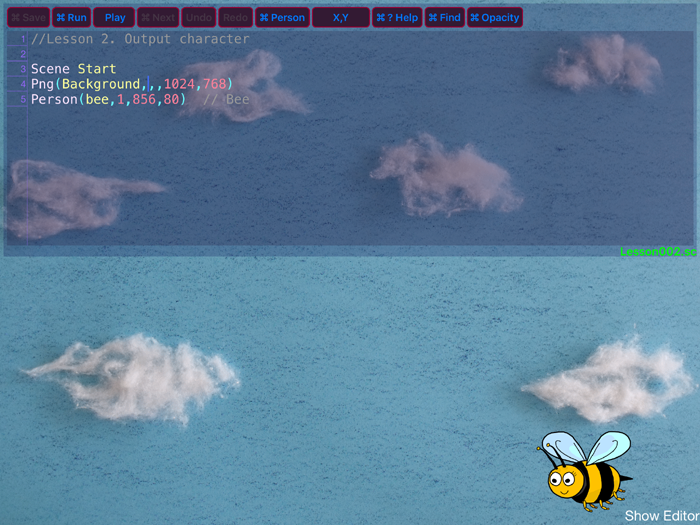
You see a background on the screen, and a bee on the background. If you tap "Show Editor", you will see the source code:
- - - - - CODE BEGIN - - - - -

//Lesson 2. Output character

Scene Start

Png(Background,,,1024,768)

Person(bee,1,856,80)  // Bee

- - - - - CODE END - - - - -
Look at the last line:
Person(bee,1,856,80) // Bee
The Person command outputs the person bee on the scene.
Next to the Person command in brackets, there are attributes (additional information) of the character.
1 – is a state number for the bee. Character states will be explained in text of this lesson
856,80 — are coordinates, where the bee should be placed on the screen.
The image of the bee, like any other image on the screen, is also called «graphic object» or, «sprite». We will use the word «sprite». So, 856,80 — are coordinates of the bee sprite.
Coordinates of sprites on the screen are given based on Game Pilot coordinate system. If you remember, coordinate system in Game Pilot depends on the orientation of the iPad screen.
Landscape 1024х768 (image coordinates are in range [0..1023, 0..767])
Portrait 768x1024 (image coordinates are in range [0..767, 0..1023])
There are many iPad models and they have different screen sizes. First of all, we speak about screen size in pixels. A pixel is a unit of measurement of any screen (computer, laptop, mobile phone, tablet, ...) A pixel is the point. Depending on size of the screen in pixels, all iPad devices are divided into two groups:
- With 2048x1536 pixel size (they are also called „Retina“ or, „with Retina Display“)
- With 1024х768 pixel size (including a popular device iPad2, so when we speak about iPad2 device, we will mean 1024х768 pixel resolution).
You can say about the first device group, that they have resolution of 2048x1536 points or pixels. The devices of the second group have resolution of 1024х768 pixels.
The screen size of Retina is 2 times larger than the screen size of iPad2 screen. Therefore, the images that are made for Retina devices should be 2 times larger than the images that are made for iPad2. You can make images for Retina devices only - in this case, iPad2 will use images for Retina (reducing them on the screen).
The coordinate system in Game Pilot is the same for both, iPad2 and Retina. As we said before, in Landscape mode image coordinates are given in range [0..1023, 0..767]:
(0,0) - bottom left corner of the screen;
(1023,767) - right top corner of the screen;
Therefore, coordinates of a sprite on the screen do not depend on a device.
Let us look at the bee character in the source code of the project "2 Output of a character". You see following string:
Person(bee,1,856,80) // Bee
To open the code of the bee character, place the cursor on the word «bee». Select the «Person» command from the top menu (if you use a Bluetooth-keyboard, use the Cmd+P hotkey instead of tapping «Person»).
The code of the bee person will open:
- - - - - CODE BEGIN - - - - -

Scale = 50

1: Img=1

   Rest

- - - - - CODE END - - - - -
This file is also called character description. It has .stt-extension. You can see here the name of the character green on the right of the screen next to the editor window: bee.stt.
Now, we will look at the text of bee.stt file:
Scale = 50
The Scale command resizes picture (in %). Scale = 50 means «resize all images of the character to 50% of its original size».
The Scale = 50 command should always be at the beginning (in the head) of a .stt-file, when the images are meant for Retina screen. This command make images display correctly.
Then the first state of the character follows:
1: Img=1
Rest
The Img=1 command means «output image number 1».
The Rest command ends a current state.
In our case, the bee character has only one state. All we do in this state is display one image. We can create other states as well. For example, the bee may move from one screen corner to another, or it may buzz, or it may disappear and appear again, get bigger, turn, etc… You can make that one state changes another. In the next lessons, we will learn how to do it.
Now, download the folder of the project "2 Output of a character" on your computer. There are two files in this folder:
Lesson002.sc - scene description.
Background.png – background image.
bee.stt – states description for the bee character
bee001.png – image 1 of the bee character. Note how the images are numbered. Image 2 will have name bee002.png. Image 135 will have name bee135.png.
Task 1:
On the last lesson, you created your own project. Try now to output any character in this project. For a character, take any image in PNG format, which does not exceed 2048x1536 pixel size.
Besides the image, you need to create a .stt-file. Create it in a text editor.
And naturally you must add the character in the .sc-file. For this purpose, as we already know, the command Person must be used.
Place all the new/edited files into the project order on your iPad, then run Game Pilot (see the instructions of the last lesson). See if everything looks as it supposed to.
Edit the code text if it is necessary. After you edited and loaded the files, you can just select the "Run" command from the top menu, or use the Cmd+R hotkey on your Bluetooth-keyboard. The project will run and you will see the changes immediately.
Task 2::
You can place more than one character on the screen. For each new character, you must create a .stt-file and use at least one image. Create one more character in your project.