Select the device which you develop the application for:
Things you will learn:
- that image names can have -ipad or -4x suffixes and that one can make images of different sizes for iPad and Retina.
- we will try to edit a project directly in Game Pilot
- we will learn to define coordinates of a character on the screen and move the character by dragging it or using arrows on the keyboard.
- menu commands and hotkeys for Game Pilot.
On the last lesson, we leaned to output a character on the screen. In the "2 Output of a character" project, we had a character bee. We used two files for it: bee.stt - states description for the character, and bee001.png – an image for the character.
The bee001.png image had 300x250 pixel size and was made for Retina (2048x1536 pixels) screen.
You can use the same image for both iPad2 and Retina screens. It is useful if you make an image for Retina and then scale it down to 50% during output. For this purpose, use the command Scale=50 in the head of the file.
On your iPad, open the bee.stt file from the project "2 Output of a character". Note that the first command is:
Scale = 50
Sometimes images that look good on Retina, have a bad quality on iPad2. There are two ways to avoid it:
1. Make images for Retina so that their size (both, width and height value) is a multiple of 4. For example, the bee001.png image has 300x250 pixel size. 300 is a multiple of 4. But 250 is not a multiple of 4. You can edit the image so that it has 300x256 pixel size. Now this image will look on iPad2 better than before.
2. You can make different images for Retina and iPad2. The sizes of the images for iPad2 will be 2 times smaller than for Retina. You must use the "-4x" suffix in the image names for Retina, and the "-ipad" suffix in the image names for iPad2.
For example, if you make images for the bee character, the image files will have the following names: bee001-4x.png (for Retina) bee001-ipad.png (for iPad2).
Game Pilot will use an appropriate image file according to the device.
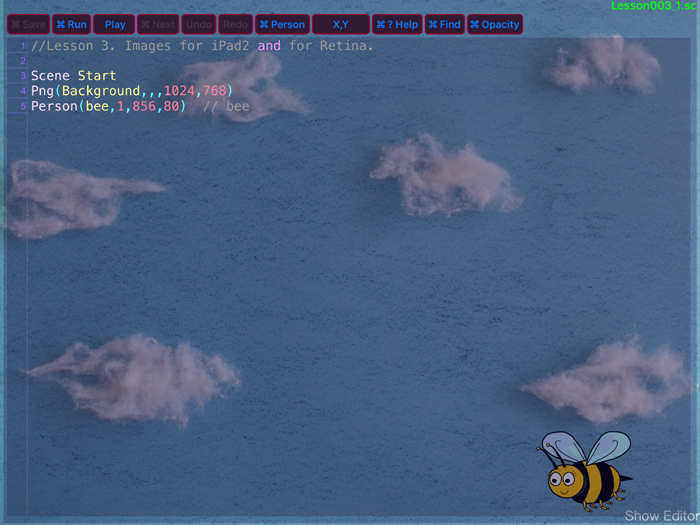
Start Game Pilot, select "Prepare demo project", then select the "3 Images for iPad and Retina" project. Open the project. There are two images of the bee in this project. The one is for Retina screen and the other is for iPad2 screen.
Background-4x.png – background for Retina.
Background-ipad.png – background for iPad2.
bee.stt - states description for the bee character.
bee001-4x.png – image 1 for the bee character for Retina.
bee001-ipad.png – image 1 for the bee character for iPad2.
Open the bee.stt file. There is no Scale = 50 command in the head of the file because we use different images for Retina and iPad2.
Compare the sizes of the Background-4x.png and Background-ipad.png images. How many times are the width and the height of the first image larger than the width and the height of the second image? Compare the sizes of the bee001-4x.png and bee001-ipad.png images.
In our Game Pilot lessons, we will use images for Retina only. Therefore, we will not use the suffixes -4x and -ipad in the name of the images. However, you might want to use different images for each device in your own projects in the future.
Now, we will take a look at Game Pilot editor. Till now, you edited and wrote text in the text editor on your computer, and then transferred it to your iPad.
You can edit text directly in Game Pilot.
Task 1:
Open the project that you created on the 1st lesson.
If you use FTP for file transferring, select the option:
FTP read/write permission
elect your project from the list.
If you copied the files using USB, select the option Locally and select your project from the list.
The background and the character images of this project were created by you. Now, tap Show Editor at the bottom right corner. If you use a Bluetooth keyboard, use the Cmd+E hotkey.
The Game Pilot editor will open. In the opened window, you will see the code of the .sc-file. This is the code you created in your text editor on your computer. You can edit this code now, directly in Game Pilot.
Try to change the coordinates in the line Person(…..)
You can use the commands Undo and Redo from the top menu of the editor while working with text (on a keyboard, you should use the hotkeys Cmd+Z and Cmd+Shift+Z).
After you changed the coordinates, select the Save command (Cmd+S on a keyboard). The code will be saved.
Then select command Run (Cmd+R).
Did the character change its position on the screen?
If you use FTP and if you have chosen FTP read/write permission option when you started Game Pilot, then after you run the project, Game Pilot will establish connection with the server and compare the files on the device with the files on the server. Since the .sc-file on your iPad is more fresh one, Game Pilot will upload it on the server and will delete the old .sc-file.
Do you remember, how do you open an .stt-file of a character?
To open it, place the cursor on a character name in the .sc-file. Then select the "Person" command from the top menu (or, use the Cmd+P hotkey). Now, open the .stt-file of your character. You can edit this file. To go back to the .sc-file, just select the Scenes command from the top menu or, use the Cmd+P hotkey again.
Now, return to the .sc-file from the file of your character.
Task 2:
Game Pilot can determine coordinates of a character.
In your project (while the editor is closed) tap any spot on the screen. Then open the editor.
In the editor menu, there is a button with coordinates values (between the buttons Person and Help). The values you see on the button are the coordinates of the spot you've just tapped.
Close the editor and tap another spot on the screen. Then see how the values on the button changed.
You can determine coordinates of any spot on the screen even if the editor window is open and even if the spot is under the window. To make it, just touch the sceen somewhere outside of the editor window and then drag the finger to the spot under the window.
When you create a project and know where your character should be on the screen, the only thing you need to do is to tap this spot on the screen, and Game Pilot will determine the coordinates. This spot will correspond to the center of the sprite image. Look at the coordinate values on the button and enter them to the .sc-file: Person(bee,1,...,...)
If you want to determine coordinates of touching in the upper part of the screen, you can move the editor window down using the Cmd+Down hotkey.
If you want to determine coordinates of touching in the lower part of the screen, you can move the editor window up using the
Cmd+Up
hotkey.
To edit text comfortably, you can expand the editor window to fill the entire screen using the Cmd+= hotkey.
Task 3:
If you want to change the position of your character on the screen, Game Pilot will help you as well. This is possible in the Wait mode that starts automatically after you open the editor window. In this mode, the playing of the project (actions of the characters) stops.
Open the editor in your project. If you do not use a Bluetooth-keyboard, remove the virtual keyboard from the screen. The project will stop. Now, close the editor again by tapping Show Editor again or, using the Cmd+E hotkey. The project is still in the Wait mode.
Now just drag your character to any other place on the screen. Then open the editor again. In the .sc-file you will see, that the coordinates of your character have changed. Game Pilot has determined the new coordinates and changed the code accordingly.
You can also try to drag the character while the editor window is open (but remove the virtual keyboard if it is on the screen). You will see that the character coordinates change in the code of .sc-file while you are dragging the image.
Use Undo and Redo commands to cancel the changes.
When you dragged your character to a new place, choose the Play button in the editor. Game Pilot will exit the Wait mode and will return to the Play mode.
If you use a keyboard, you can move the person using buttons Alt+arrows while the editor window is open. If the editor is closed, you can move the character using the arrows by 10 points.
So you have changed your character's position on the screen. To save the changes, use the Save command.
If you use FTP and selected FTP read/write permission, tap the Run command to restart the project. The new file will substitute the old one on the server.
For those who use FTP to work with Game Pilot
You have now changed your code in Game Pilot. The new file is also on the server. But don't forget you still have the old code on the computer.
Sometimes it is useful to edit a project in Game Pilot (for example, when you need to determine coordinates), and sometimes it is useful to edit a project on a computer. Therefore you should always make sure you saved an actual version of your file(s) on the computer. If an edited file was uploaded from Game Pilot to your server, you need to update this file on the computer manually. Similarly, if you edit any file on your computer, you should upload it to your server manually. After you uploaded the file to the server, just tap the
Run button (Cmd+R hotkey) in Game Pilot editor. The project will be updated and will start again.
If you make any changes in Game Pilot (if you selected FTP read/write permission and have internet connection), you don't need to care about updating files. Because Game Pilot always looks which file is the freshest one and either uploads it to the server, or downloads it.
See the Help file for more information about editor menu commands and hokeys. To open the Help file, use the Help button (Cmd+?).