Select the device which you develop the application for:
We will learn:
- How to change the size of a character using the properties Scale, ScaleX, ScaleY.
- How to replace one character sprite with another sprite using the Opacity property.
- How to output the sound using the Mp3 command.
- We will also speak about some aspects of using the Delay command.
On the last lesson, we have learned the Delay command. You don't have to put the Delay command in the beginning of the string if the delay time for this string is the same as for the previous one. For example, in the 1st state:
- - - - - CODE BEGIN - - - - -

Scale = 50

1: Img=1

   Rest

1: Img=1

   Delay=500 dX=200

   dA=180

   dX=-200

   Rest

- - - - - CODE END - - - - -
the delay time for execution of the 3rd string (command dA=180) is the same as the delay time of the previous string, i.e. 500 ms. The delay time of the 4th string (dX=-200) is the same as well.
As you see, there is no Delay command in the 1st string. In this case, the command will be executed with a delay of 100 ms by default.
And here:
- - - - - CODE BEGIN - - - - -

Scale = 50

1: Img=1

   dX=200

   dA=180

   dX=-200

   Rest

- - - - - CODE END - - - - -
each string will be executed with a 100 ms delay.
The Delay value can be set in the head of a character file. Then it will be used for execution of state commands (the head itself will be executed without any delay). For example:
- - - - - CODE BEGIN - - - - -

Scale = 50

Delay=380

1: Img=1

   dX=200

   dA=180

   dX=-200

   Rest

- - - - - CODE END - - - - -
here each string will be executed with a delay of 380 ms.
Now let us speak about character properties.
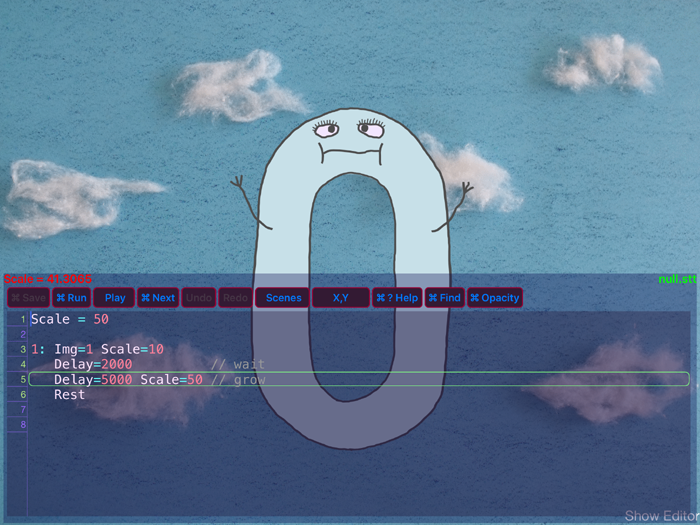
One of the character properties is Scale. This command sets size of a sprite, in %. You know this command already, it stays in the head of the .stt-file:
Scale = 50
Start Game Pilot, select "Prepare demo project", then select the "5 Sprites and sound" project. Open the project. Wait a couple of seconds till the commands of the project have executed.
The image of the character is made for Retina screen. Since the same image will be used for iPad2, there is a command Scale = 50 in the head of the .stt-file.
If we don't use the command Scale=50, but use the command Scale=100 instead:
Delay=5000 Scale=100 // grow
the null would be so large that it would go out of the screen. Since we work only with pictures for Retina, we need to resize all the images to 50% (the command Scale=50 in the head of the file). But if we use the Scale command somewhere else in the code, the Scale command in the head will be ignored. The command Scale=100 makes Game Pilot ignore the command Scale=50 in the head of the file. So the right way to increase the image would be:
Delay=5000 Scale=50 // grow
Task 1:
In your project, output one character using the Scale=5 command, and the other one – using the Scale=40 command. Use these commands directly after the commands Img=..., for example:
Img=1 Scale=5
Run the project and see how it looks now.
You can increase or decrease an entire image. But you can also change only the width of an image. Or, only the height. The ScaleX command resizes a picture horizontally. And the ScaleY command resizes a picture vertically
Task 2:
Add the ball character to your project (you can download the image of a ball here). Make it gradually increase size using the Scale command.
Task 3:
Now use the ScaleX= command instead of Scale= . How does the ball now increase?
Task 4:
Use the ScaleY= command instead of ScaleX= . How does the ball now increase?
Now, we will go back to the project "5 Sprites and sound" (the name of the project folder is Lesson005) and add sound. Use the command Mp3 for this purpose. For example, the command Mp3=1 for the null character will play sound file null001.mp3. And the Mp3=2 command will play sound file null002.mp3. Mp3-files for a character are named and numbered using the same principle as png-images.
The code below describes the null character. The null gradually puffs up and then bursts. Each of these actions is accompanied by a sound:
On your computer, copy this code and insert it into the null.stt file in the folder Lesson005, instead of the old one. Transfer the changes to your iPad and run the project.
Let us look to this code. In the 1st state, there is the following line:
Delay=100 ScaleX=55 Mp3=1// grow
Within 100 ms, the null increases its width to 55%. As soon as these 100 ms begin to count out, the sound null001.mp3 begins to play.
There is also the following line in the code:
Delay=0 Img=2 // splash instead of null
This means, now instead of the image null001.png, the image null002.png should be displayed. Image null002.png is the "splash" of the bursting null. Since Delay=0, the image null002.png will substitute the image null001.png immediately.
Next is the following line:
Delay=300 ScaleX=75 Mp3=2 // splash grows
Within 300 ms, the splash increase its width to 75%. As soon as these 300 ms begin to count out, the sound null002.mp3 begins to play.
The following line is:
Delay=0 Opacity=0 // splash disappears
The Opacity command allows you to regulate the opacity of a sprite. Opacity=0 means "fully transparent". Within 0 ms (i.e. immediately), the splash image becomes transparent (disappears). If we had Delay=500 Opacity=0, the splash would become transparent gradually.
Task 6:
Try to use the commands Mp3 and Opacity in your own project. To use the Mp3 command, you will need one or several Mp3-files. You can download an archive with sound files for experimenting here.

